在前三篇中,我们已经完成了浏览器渲染流程的前三个关键步骤:
本篇将实现渲染流程的最后两个步骤:布局(Layout)和 渲染(Rendering),将计算好的样式转换为可视化的几何图形。
渲染流程回顾
1.✅取得HTML文本
2.✅解析HTML,构建DOM
3.✅计算CSS样式
4.🔄 布局(Layout)-计算元素位置和尺寸
5.🔄 绘制(Painting)-将元素绘制到画布上
本篇的目标是实现步骤4和5,完成从样式到视觉的转换。
布局系统的集成时机
在开始实现布局算法之前,我们需要了解布局在什么时候被调用。在我们的实现中,布局计算被集成到了HTML解析过程中:
// 在domParse.js的emit函数中
case 'endTag':
  if (top.tagName !== token.tagName) {
    throw new Error(`Tag start end does'n match`)
  } else {
    // 如果是style标签 收集css逻辑
    if (top.tagName === 'style') {
      addCSSRules(top.children[0].content)
    }
    //布局计算 - 我们在每个元素的标签匹配时进行布局 但是不要把这里理解为浏览器实际layout的时机 因为浏览器有很多的策略来优化页面渲染
    layout(top)
    // 如果匹配到 将最后一个元素出栈
    stack.pop()
  }
  currentTextNode = null
  break
为什么在结束标签时进行布局?
-
子元素完整 :当遇到结束标签时,该元素的所有子元素都已经解析完成
-
样式就绪 :CSS样式计算已经完成,computedStyle已经准备好
-
递归布局 :从内到外进行布局,确保子元素布局完成后再布局父元素
这种设计确保了布局计算的正确顺序和时机。
1.布局系统设计
1.1布局的核心概念
在浏览器中,布局是一个复杂的过程,需要处理各种不同的盒模型和不同的布局上下文。
为了简化实现,我们只实现一个简化的Flex 布局,这是我们开发中最常用的布局方式。
1.2 Flex 布局原理
Flex 布局基于两个轴:
- 主轴(MainAxis) :flex-direction 决定的方向
- 交叉轴(CrossAxis) :垂直于主轴的方向
// 布局配置映射表 - 通过配置消除复杂的条件判断
const FLEX_DIRECTION_MAP = {
  'row': {
    mainSize: 'width',      // 主轴尺寸
    mainStart: 'left',      // 主轴起始位置
    mainEnd: 'right',       // 主轴结束位置
    mainSign: 1,            // 主轴方向符号
    crossSize: 'height',    // 交叉轴尺寸
    crossStart: 'top',      // 交叉轴起始位置
    crossEnd: 'bottom'      // 交叉轴结束位置
  },
  'row-reverse': {
    mainSize: 'width',
    mainStart: 'right',     // 反向:从右开始
    mainEnd: 'left',
    mainSign: -1,           // 反向:符号为负
    crossSize: 'height',
    crossStart: 'top',
    crossEnd: 'bottom'
  },
  'column': {
    mainSize: 'height',     // 列方向:主轴是高度
    mainStart: 'top',
    mainEnd: 'bottom',
    mainSign: 1,
    crossSize: 'width',     // 列方向:交叉轴是宽度
    crossStart: 'left',
    crossEnd: 'right'
  },
  'column-reverse': {
    mainSize: 'height',
    mainStart: 'bottom',    // 反向:从下开始
    mainEnd: 'top',
    mainSign: -1,
    crossSize: 'width',
    crossStart: 'left',
    crossEnd: 'right'
  }
}
2.样式解析与预处理
2.1样式解析函数
// 解析样式 - 将computedStyle转换为可计算的数值
function getStyle(element) {
  if (!element.style) element.style = {}

  for (const prop in element.computedStyle) {
    const value = element.computedStyle[prop].value
    // 统一处理数值类型
    if (typeof value === 'string' && (/px$/.test(value) || /^[0-9\.]+$/.test(value))) {
      element.style[prop] = parseFloat(value) || 0
    } else {
      element.style[prop] = value
    }
  }
  return element.style
}
2.2 CSS属性名转换
// CSS属性名转换:kebab-case -> camelCase
function toCamelCase(str) {
  return str.replace(/-([a-z])/g, (match, letter) => letter.toUpperCase())
}

// 同步样式到element.style - 确保布局结果正确反映到元素属性
function syncStyleToElement(item, itemStyle, mainSize, mainStart, mainEnd) {
  item.style[mainSize] = itemStyle[mainSize]
  item.style[mainStart] = itemStyle[mainStart]
  item.style[mainEnd] = itemStyle[mainEnd]
}

// 设置默认样式
function setDefaults(style) {
  // 尺寸默认值处理
  if (!style.width || style.width === 'auto') style.width = null
  if (!style.height || style.height === 'auto') style.height = null

  // CSS属性名转换 - 将kebab-case转换为camelCase
  for (const prop in style) {
    if (prop.includes('-')) {
      const camelProp = toCamelCase(prop)
      if (!style[camelProp]) {
        style[camelProp] = style[prop]
      }
    }
  }

  // flex属性默认值 - 确保所有必要的flex属性都有默认值
  const defaults = {
    flexDirection: 'row',
    alignItems: 'stretch',
    alignContent: 'stretch',
    flexWrap: 'nowrap',
    justifyContent: 'flex-start'
  }

  for (const [key, value] of Object.entries(defaults)) {
    style[key] = style[key] || value
  }
}
3. Flex 布局核心算法
3.1 收集 Flex 行
// 收集flex行
function collectFlexLines(style, items, mainSize, crossSize) {
  const flexLines = []
  let flexLine = []
  let mainSpace = style[mainSize] || 0
  let crossSpace = 0

  for (const item of items) {
    const itemStyle = getStyle(item)
    if (itemStyle[mainSize] === null) itemStyle[mainSize] = 0

    // flex元素直接加入
    if (itemStyle.flex) {
      flexLine.push(item)
      crossSpace = Math.max(crossSpace, itemStyle[crossSize] || 0)
      continue
    }

    // nowrap模式 - 全部放一行
    if (style.flexWrap === 'nowrap') {
      flexLine.push(item)
      mainSpace -= itemStyle[mainSize]
      crossSpace = Math.max(crossSpace, itemStyle[crossSize] || 0)
      continue
    }

    // wrap模式 元素不能超出父元素宽度 超出设置为父元素宽度
    if (itemStyle[mainSize] > style[mainSize]) {
      itemStyle[mainSize] = style[mainSize]
    }

    if (mainSpace < itemStyle[mainSize] && flexLine.length > 0) {
      // 保存当前行
      flexLine.mainSpace = mainSpace
      flexLine.crossSpace = crossSpace
      flexLines.push(flexLine)
      // 开始新行
      flexLine = [item]
      mainSpace = style[mainSize] - itemStyle[mainSize]
      crossSpace = itemStyle.crossSize || 0
    } else {
      flexLine.push(item)
      mainSpace -= itemStyle[mainSize]
      crossSpace = Math.max(crossSpace, itemStyle.crossSize || 0)
    }
  }

  // 保存最后一行
  if (flexLine.length) {
    flexLine.mainSpace = mainSpace
    flexLine.crossSpace = crossSpace
    flexLines.push(flexLine)
  }

  return flexLines
}
3.2 主轴布局算法
function layoutMainAxis(style, flexLine, mainSize, mainStart, mainEnd, mainSign, mainBase) {
  const items = flexLine
  let mainSpace = flexLine.mainSpace || 0

  // 1. 计算flex元素总权重
  const flexTotal = items.reduce((sum, item) => {
    const itemStyle = getStyle(item)
    return sum + (itemStyle.flex || 0)
  }, 0)

  // 2. 处理空间分配
  if (mainSpace < 0 && style.flexWrap === 'nowrap') {
    // 计算出总的占用空间
    const totalFixedSize = items.reduce((sum, item) => {
      const itemStyle = getStyle(item)
      return sum + (itemStyle.flex ? 0 : itemStyle[mainSize])
    }, 0)
    // 计算出比例
    const scale = style[mainSize] / totalFixedSize
    // 遍历所有元素,按比例压缩非flex元素
    items.forEach(item => {
      const itemStyle = getStyle(item)
      if (!itemStyle.flex) {
        itemStyle[mainSize] *= scale
      }
    })
    mainSpace = 0
  } else if (flexTotal > 0) {
    // flex模式:按照flex的占比分配剩余空间给flex元素
    items.forEach(item => {
      const itemStyle = getStyle(item)
      if (itemStyle.flex) {
        itemStyle[mainSize] = (mainSpace / flexTotal) * itemStyle.flex
      }
    })
    mainSpace = 0
  }

  // 3. 计算justify-content布局参数
  let currentMain = mainBase
  let step = 0

  switch (style.justifyContent) {
    case 'flex-start':
      break
    case 'flex-end':
      currentMain = mainBase + mainSign * mainSpace
      break
    case 'center':
      currentMain = mainBase + mainSign * mainSpace / 2
      break
    case 'space-between':
      if (items.length > 1) {
        step = mainSpace / (items.length - 1) * mainSign
      }
      break
    case 'space-around':
      step = mainSpace / items.length * mainSign
      currentMain = mainBase + step / 2
      break
    case 'space-evenly':
      step = mainSpace / (items.length + 1) * mainSign
      currentMain = mainBase + step
      break
    default:
      break
  }

  // 4. 设置元素位置并同步样式
  for (const item of items) {
    const itemStyle = getStyle(item)
    itemStyle[mainStart] = currentMain
    itemStyle[mainEnd] = currentMain + mainSign * itemStyle[mainSize]

    syncStyleToElement(item, itemStyle, mainSize, mainStart, mainEnd)
    currentMain = itemStyle[mainEnd] + step
  }
}
3.3 交叉轴布局算法
// 计算交叉轴位置
function layoutCrossAxis(style, flexLines, crossSize, crossStart, crossEnd, crossSign, crossBase) {
  // 计算总的交叉轴空间
  let crossSpace = style[crossSize] || 0

  if (!style[crossSize]) {
    // 自动高度
    style[crossSize] = 0
    for (const line of flexLines) {
      style[crossSize] += line.crossSpace
    }
  } else {
    // 固定高度 - 计算剩余空间
    for (const line of flexLines) {
      crossSpace -= line.crossSpace
    }
  }

  // align-content布局
  let lineOffset = crossBase
  let step = 0

  if (flexLines.length > 1) {
    switch (style.alignContent) {
      case 'flex-end':
        lineOffset += crossSign * crossSpace
        break
      case 'center':
        lineOffset += crossSign * crossSpace / 2
        break
      case 'space-between':
        step = crossSpace / (flexLines.length - 1)
        break
      case 'space-around':
        step = crossSpace / flexLines.length
        lineOffset += crossSign * step / 2
        break
    }
  }

  // 处理每一行
  for (const items of flexLines) {
    const lineCrossSize = style.alignContent === 'stretch'
      ? items.crossSpace + crossSpace / flexLines.length
      : items.crossSpace

    // 处理行内每个元素
    for (const item of items) {
      const itemStyle = getStyle(item)
      const align = style.alignItems

      if (!itemStyle[crossSize] && align === 'stretch') {
        itemStyle[crossSize] = lineCrossSize
      }

      switch (align) {
        case 'flex-start':
          itemStyle[crossStart] = lineOffset
          break
        case 'flex-end':
          itemStyle[crossStart] = lineOffset + crossSign * (lineCrossSize - itemStyle[crossSize])
          break
        case 'center':
          itemStyle[crossStart] = lineOffset + crossSign * (lineCrossSize - itemStyle[crossSize]) / 2
          break
        case 'stretch':
          itemStyle[crossStart] = lineOffset
          itemStyle[crossSize] = itemStyle[crossSize] || lineCrossSize
          break
        default:
          break
      }

      itemStyle[crossEnd] = itemStyle[crossStart] + crossSign * itemStyle[crossSize]
    }

    lineOffset += crossSign * (lineCrossSize + step)
  }
}
4. 主布局函数
// 主布局函数
function layout(element) {
  if (!element.computedStyle) return

  const style = getStyle(element)
  if (style.display !== 'flex') return

  // 只保留element类型的元素
  const items = element.children.filter(e => e.type === 'element')
  // 根据order排序
  items.sort((a, b) => (a.style.order || 0) - (b.style.order || 0))

  setDefaults(style)

  // 获取方向配置
  const config = FLEX_DIRECTION_MAP[style.flexDirection]
  if (!config) return // 无效的flex-direction

  let { mainSize, mainStart, mainEnd, mainSign, crossSize, crossStart, crossEnd } = config

  // 处理wrap-reverse
  let crossSign = 1
  let crossBase = 0
  if (style.flexWrap === 'wrap-reverse') {
    crossSign = -1
    crossBase = style[crossSize] || 0
    ;[crossStart, crossEnd] = [crossEnd, crossStart]
  }

  const mainBase = config.mainSign === -1 ? (style[mainSize] || 0) : 0

  // 收集flex行
  const flexLines = collectFlexLines(style, items, mainSize, crossSize)

  // 主轴布局
  for (const flexLine of flexLines) {
    layoutMainAxis(style, flexLine, mainSize, mainStart, mainEnd, mainSign, mainBase)
  }

  // 交叉轴布局
  layoutCrossAxis(style, flexLines, crossSize, crossStart, crossEnd, crossSign, crossBase)
}
完成后,我们的layout代码如下所示:
//layout.js
const FLEX_DIRECTION_MAP = {
  'row': {
    mainSize: 'width',
    mainStart: 'left',
    mainEnd: 'right',
    mainSign: 1,
    crossSize: 'height',
    crossStart: 'top',
    crossEnd: 'bottom'
  },
  'row-reverse': {
    mainSize: 'width',
    mainStart: 'right',
    mainEnd: 'left',
    mainSign: -1,
    crossSize: 'height',
    crossStart: 'top',
    crossEnd: 'bottom'
  },
  'column': {
    mainSize: 'height',
    mainStart: 'top',
    mainEnd: 'bottom',
    mainSign: 1,
    crossSize: 'width',
    crossStart: 'left',
    crossEnd: 'right'
  },
  'column-reverse': {
    mainSize: 'height',
    mainStart: 'bottom',
    mainEnd: 'top',
    mainSign: -1,
    crossSize: 'width',
    crossStart: 'left',
    crossEnd: 'right'
  }
}

// 解析样式 - 只处理px和数字,不覆盖已存在的style属性
function getStyle (element) {
  if (!element.style) element.style = {}

  for (const prop in element.computedStyle) {
    const value = element.computedStyle[prop].value
    // 统一处理数值类型
    if (typeof value === 'string' && (/px$/.test(value) || /^[0-9\.]+$/.test(value))) {
      element.style[prop] = parseFloat(value) || 0
    } else {
      element.style[prop] = value
    }
  }
  return element.style
}

// CSS属性名转换:kebab-case -> camelCase
function toCamelCase (str) {
  return str.replace(/-([a-z])/g, (match, letter) => letter.toUpperCase())
}

// 同步样式到element.style
function syncStyleToElement (item, itemStyle, mainSize, mainStart, mainEnd) {
  item.style[mainSize] = itemStyle[mainSize]
  item.style[mainStart] = itemStyle[mainStart]
  item.style[mainEnd] = itemStyle[mainEnd]
}

// 设置默认样式
function setDefaults (style) {
  // 尺寸默认值
  if (!style.width || style.width === 'auto') style.width = null
  if (!style.height || style.height === 'auto') style.height = null

  // CSS属性名转换
  for (const prop in style) {
    if (prop.includes('-')) {
      const camelProp = toCamelCase(prop)
      if (!style[camelProp]) {
        style[camelProp] = style[prop]
      }
    }
  }

  // flex属性默认值
  const defaults = {
    flexDirection: 'row',
    alignItems: 'stretch',
    alignContent: 'stretch',
    flexWrap: 'nowrap',
    justifyContent: 'flex-start'
  }

  for (const [key, value] of Object.entries(defaults)) {
    style[key] = style[key] || value
  }
}

// 收集flex行
function collectFlexLines (style, items, mainSize, crossSize) {
  const flexLines = []
  let flexLine = []
  let mainSpace = style[mainSize] || 0
  let crossSpace = 0

  for (const item of items) {
    const itemStyle = getStyle(item)
    if (itemStyle[mainSize] === null) itemStyle[mainSize] = 0

    // flex元素直接加入
    if (itemStyle.flex) {
      flexLine.push(item)
      crossSpace = Math.max(crossSpace, itemStyle[crossSize] || 0)
      continue
    }

    // nowrap模式 - 全部放一行
    if (style.flexWrap === 'nowrap') {
      flexLine.push(item)
      mainSpace -= itemStyle[mainSize]
      crossSpace = Math.max(crossSpace, itemStyle[crossSize] || 0)
      continue
    }

    // wrap模式 - 需要换行判断
    if (itemStyle[mainSize] > style[mainSize]) {
      itemStyle[mainSize] = style[mainSize]
    }

    if (mainSpace < itemStyle[mainSize] && flexLine.length > 0) {
      // 保存当前行
      flexLine.mainSpace = mainSpace
      flexLine.crossSpace = crossSpace
      flexLines.push(flexLine)
      // 开始新行
      flexLine = [item]
      mainSpace = style[mainSize] - itemStyle[mainSize]
      crossSpace = itemStyle.crossSize || 0
    } else {
      flexLine.push(item)
      mainSpace -= itemStyle[mainSize]
      crossSpace = Math.max(crossSpace, itemStyle.crossSize || 0)
    }
  }

  // 保存最后一行
  if (flexLine.length) {
    flexLine.mainSpace = mainSpace
    flexLine.crossSpace = crossSpace
    flexLines.push(flexLine)
  }

  return flexLines
}

function layoutMainAxis (style, flexLine, mainSize, mainStart, mainEnd, mainSign, mainBase) {
  const items = flexLine
  let mainSpace = flexLine.mainSpace || 0

  // 1. 计算flex元素总权重
  const flexTotal = items.reduce((sum, item) => {
    const itemStyle = getStyle(item)
    return sum + (itemStyle.flex || 0)
  }, 0)

  // 2. 处理空间分配
  if (mainSpace < 0 && style.flexWrap === 'nowrap') {
    // 压缩模式:按比例压缩非flex元素
    const totalFixedSize = items.reduce((sum, item) => {
      const itemStyle = getStyle(item)
      return sum + (itemStyle.flex ? 0 : itemStyle[mainSize])
    }, 0)

    const scale = style[mainSize] / totalFixedSize
    items.forEach(item => {
      const itemStyle = getStyle(item)
      if (!itemStyle.flex) {
        itemStyle[mainSize] *= scale
      }
    })
    mainSpace = 0
  } else if (flexTotal > 0) {
    // flex模式:分配剩余空间给flex元素
    items.forEach(item => {
      const itemStyle = getStyle(item)
      if (itemStyle.flex) {
        itemStyle[mainSize] = (mainSpace / flexTotal) * itemStyle.flex
      }
    })
    mainSpace = 0
  }

  // 3. 计算justify-content布局参数
  let currentMain = mainBase
  let step = 0

  switch (style.justifyContent) {
    case 'flex-start':
      break
    case 'flex-end':
      currentMain = mainBase + mainSign * mainSpace
      break
    case 'center':
      currentMain = mainBase + mainSign * mainSpace / 2
      break
    case 'space-between':
      if (items.length > 1) {
        step = mainSpace / (items.length - 1) * mainSign
      }
      break
    case 'space-around':
      step = mainSpace / items.length * mainSign
      currentMain = mainBase + step / 2
      break
    case 'space-evenly':
      step = mainSpace / (items.length + 1) * mainSign
      currentMain = mainBase + step
      break
  }

  // 4. 设置元素位置并同步样式
  for (const item of items) {
    const itemStyle = getStyle(item)
    itemStyle[mainStart] = currentMain
    itemStyle[mainEnd] = currentMain + mainSign * itemStyle[mainSize]
    syncStyleToElement(item, itemStyle, mainSize, mainStart, mainEnd)
    currentMain = itemStyle[mainEnd] + step
  }
}

// 计算交叉轴位置
function layoutCrossAxis (style, flexLines, crossSize, crossStart, crossEnd, crossSign, crossBase) {
  // 计算总的交叉轴空间
  let crossSpace = style[crossSize] || 0

  if (!style[crossSize]) {
    // 自动高度
    style[crossSize] = 0
    for (const line of flexLines) {
      style[crossSize] += line.crossSpace
    }
  } else {
    // 固定高度 - 计算剩余空间
    for (const line of flexLines) {
      crossSpace -= line.crossSpace
    }
  }

  // align-content布局
  let lineOffset = crossBase
  let step = 0

  if (flexLines.length > 1) {
    switch (style.alignContent) {
      case 'flex-end':
        lineOffset += crossSign * crossSpace
        break
      case 'center':
        lineOffset += crossSign * crossSpace / 2
        break
      case 'space-between':
        step = crossSpace / (flexLines.length - 1)
        break
      case 'space-around':
        step = crossSpace / flexLines.length
        lineOffset += crossSign * step / 2
        break
    }
  }

  // 处理每一行
  for (const items of flexLines) {
    const lineCrossSize = style.alignContent === 'stretch'
      ? items.crossSpace + crossSpace / flexLines.length
      : items.crossSpace

    // 处理行内每个元素
    for (const item of items) {
      const itemStyle = getStyle(item)
      const align = style.alignItems

      if (!itemStyle[crossSize] && align === 'stretch') {
        itemStyle[crossSize] = lineCrossSize
      }

      switch (align) {
        case 'flex-start':
          itemStyle[crossStart] = lineOffset
          break
        case 'flex-end':
          itemStyle[crossStart] = lineOffset + crossSign * (lineCrossSize - itemStyle[crossSize])
          break
        case 'center':
          itemStyle[crossStart] = lineOffset + crossSign * (lineCrossSize - itemStyle[crossSize]) / 2
          break
        case 'stretch':
          itemStyle[crossStart] = lineOffset
          itemStyle[crossSize] = itemStyle[crossSize] || lineCrossSize
          break
        default:
          break
      }

      itemStyle[crossEnd] = itemStyle[crossStart] + crossSign * itemStyle[crossSize]
    }

    lineOffset += crossSign * (lineCrossSize + step)
  }
}

// 主布局函数
function layout (element) {
  if (!element.computedStyle) return

  const style = getStyle(element)
  if (style.display !== 'flex') return

  // 准备工作
  const items = element.children.filter(e => e.type === 'element')
  items.sort((a, b) => (a.style.order || 0) - (b.style.order || 0))

  setDefaults(style)

  // 获取方向配置
  const config = FLEX_DIRECTION_MAP[style.flexDirection]
  if (!config) return // 无效的flex-direction

  let { mainSize, mainStart, mainEnd, mainSign, crossSize, crossStart, crossEnd } = config

  // 处理wrap-reverse
  let crossSign = 1
  let crossBase = 0
  if (style.flexWrap === 'wrap-reverse') {
    crossSign = -1
    crossBase = style[crossSize] || 0
      ;[crossStart, crossEnd] = [crossEnd, crossStart]
  }

  const mainBase = config.mainSign === -1 ? (style[mainSize] || 0) : 0

  // 收集flex行
  const flexLines = collectFlexLines(style, items, mainSize, crossSize)

  // 主轴布局
  for (const flexLine of flexLines) {
    layoutMainAxis(style, flexLine, mainSize, mainStart, mainEnd, mainSign, mainBase)
  }

  // 交叉轴布局
  layoutCrossAxis(style, flexLines, crossSize, crossStart, crossEnd, crossSign, crossBase)

}

module.exports = layout
5.渲染系统
5.1渲染器设计
// 这里我们使用了canvas作为渲染器 因为我们想输出一张图片来看一下我们的布局的实际样子
const { createCanvas } = require('canvas')
const fs = require('fs')

/**
 * 创建 viewport - 渲染画布
 */
function createViewport(width, height) {
  const canvas = createCanvas(width, height)
  const ctx = canvas.getContext('2d')

  return {
    canvas,
    ctx,
    draw(img, left, top) {
      ctx.drawImage(img, left, top)
    },
    toBuffer(mime = 'image/png') {
      return canvas.toBuffer(mime)
    },
    save(path, mime = 'image/png') {
      fs.writeFileSync(path, this.toBuffer(mime))
    }
  }
}

/**
 * 渲染 element 到 viewport
 */
function render(viewport, element) {
  if (element.style) {
    const { width, height, left = 0, top = 0, ['background-color']: bg } = element.style

    if (width && height) {
      // 新建一个子 canvas
      const imgCanvas = createCanvas(width, height)
      const imgCtx = imgCanvas.getContext('2d')

      if (bg) {
        // 解析背景色
        const match = bg.match(/rgb\((\d+),\s?(\d+),\s?(\d+)\)/)
        let color = 'rgb(0,0,0)'

        if (match) {
          const r = parseInt(match[1])
          const g = parseInt(match[2])
          const b = parseInt(match[3])
          color = `rgb(${r},${g},${b})`
        }
        imgCtx.fillStyle = color
        imgCtx.fillRect(0, 0, width, height)
      }

      viewport.draw(imgCanvas, left, top)
    }
  }

  // 递归渲染子元素
  if (element.children) {
    for (const child of element.children) {
      render(viewport, child)
    }
  }
}
5.2 集成到原有代码中
// 修改后的 server.js 我们主要修改里边的html用例 加入flex布局的一些元素来测试我们的layout
const http = require('http')
const fs = require('fs')

const htmlContent =`
<html>

<head>
  <style>
    #container {
      width: 800px;
      height: 600px;
      display: flex;
      justify-content: space-around;
      align-items: center;
      background-color: rgb(255, 255, 255);
    }

    #container #myid {
      width: 200px;
      height: 300px;
      order: 2;
      background-color: rgb(255, 0, 0);
    }

    #container .c1 {
      width: 100px;
      height: 100px;
      order: 1;
      background-color: rgb(255, 255, 0);
    }

    #container .c2 {
      width: 200px;
      height: 300px;
      background-color: rgb(255, 0, 255);
      display: flex;
      justify-content: center;
    }

    #container .c3 {
      width: 100px;
      height: 30px;
      background-color: rgb(0, 0, 255);
    }
  </style>
</head>

<body>
  <div id="container">
    <div id="myid"></div>
    <div class="c1"></div>
    <div class="c2"></div>
    <div class="c3"></div>
  </div>
</body>

</html>
`

const server = http.createServer((req, res) => {
  res.setHeader('Content-Type', 'text/html')
  res.writeHead(200, { 'Content-Type': 'text/plain' })

  res.end(htmlContent)
})

server.listen(8088)
// 修改后的 client.js 不知道具体代码的同学可以翻看之前的文章
const net = require('node:net')
const parser = require('./domParse.js')
const { render, createViewport } = require('./render')
const layout = require('./layout')

void async function () {
  let request = new Request({
    method: 'POST',
    host: '127.0.0.1',
    port: 8088,
    body: { a: '1' },
    headers: {
      'Content-Type': 'application/x-www-form-urlencoded'
    },
    path: '/'
  })

  let response = await request.send()
  let dom = parser.parseHTML(response.body)

  const viewport = createViewport(800, 600)
  render(viewport, dom[0])

  // 保存结果
  viewport.save('viewport.png')
}()
然后我们执行代码会根据我们的dom元素的信息给我们在当前目录生成一张图片
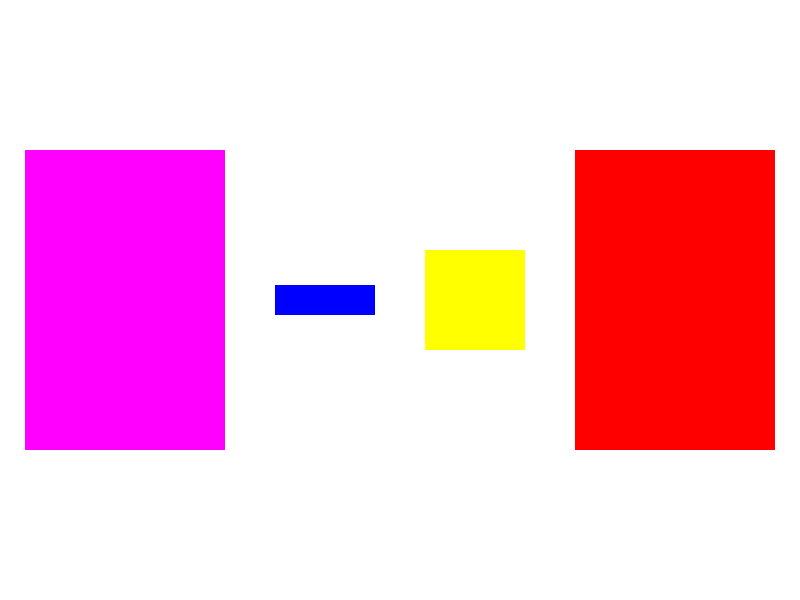
此时 我们就完成了一个从css到位图的转换过程
*通过这四篇文章,我们实现了浏览器渲染的核心流程的简化版本:
1. 网络层:HTTP请求解析
2.解析层:HTML→DOM树
3.样式层:CSS→computedStyle
4.布局层:样式→几何位置
5. 渲染层:几何位置信息→位图图像
这就是现代浏览器的核心工作原理,真实的浏览器环境有太多的额外的优化和处理,这一部分部分大家可以根据自己的需要自行了解,本系列文章只是希望可以帮助大家理解一下浏览器的一些基本运作原理。浏览器原理系列的文章也就到此画上一个句号了,后续有其他的东西会继续和大家分享。
